Course
Z-Index
CSS Tutorial
This CSS tutorial is designed for beginners to navigate through the essentials and intricate aspects of CSS styling. Upon finishing this tutorial, participants will possess a comprehensive understanding of CSS, setting a solid foundation for further exploration and mastery. This guide aims to equip you with the skills necessary to transform your visions into visually appealing web designs, laying the groundwork for your journey towards becoming an accomplished web designer.
z-index
CSS z-index property is used to control the stacking order of elements in a web page when they overlap in the same stacking context. Elements with a higher z-index value appear in front of elements with lower values.
The following diagram demonstrates the z-index layout for reference:
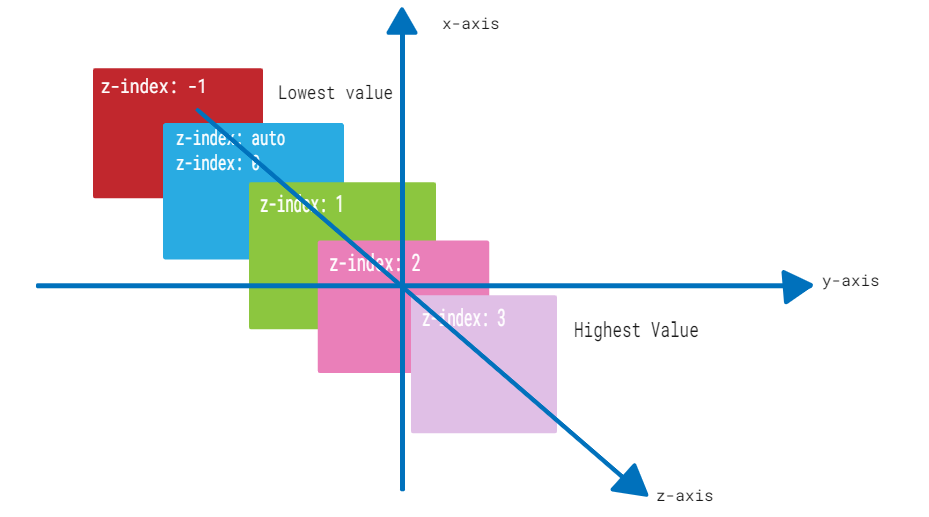
The z-index property can be used with positioned elements that are nested inside of other positioned elements.
Possible Values
- auto − The default value. The stack order is equal to that of the parent element.
- <Integer> − A positive or negative integer. It sets the element's stack level to the given value.
Applies to
All positioned elements.
DOM Syntax
object.style.zIndex = "2";CSS z-index - auto Value
CSS z-index: auto sets the z-index of an element to its parent element's stack order. It is the default value for the z-index property.
<html><head><style> .box1 { position: absolute; height: 200px; width: 280px; background-color: #f0baba; z-index: auto; text-align: center; padding: 3px; left: 10px; top: 10px; } .box2 { position: absolute; height: 120px; width: 200px; background-color: #eae98f; z-index: 1; text-align: center; padding: 5px; margin: 20px; left: 30px; top: 30px; } p { margin-top: 250px; }</style></head><body> <p>The element with z-index value of auto appears behind the element with the z-index value of 1.</p> <div class="box1"> <span>CSS z-index: auto</span> <div class="box2"> <span>CSS z-index: 1</span> </div> </div> </body></html>CSS z-index - with Positive Integer
CSS z-index property can have a positive integer value. The element with a higher integer value will appear above elements with lower values in the stacking order.
<html><head><style> .box1 { position: absolute; height: 200px; width: 280px; background-color: #f0baba; z-index: 1; text-align: center; padding: 3px; left: 10px; top: 10px; } .box2 { position: absolute; height: 140px; width: 220px; background-color: #eae98f; z-index: 2; text-align: center; padding: 5px; margin: 10px; left: 30px; top: 30px; } .box3 { position: absolute; height: 90px; width: 160px; background-color: #b7c8ae; z-index: 3; text-align: center; padding: 5px; margin: 20px; left: 50px; top: 50px; } p { margin-top: 250px; }</style></head><body> <p>The element with z-index value of 1 appears behind the element with the z-index value of 2 and 3.</p> <div class="box1"> CSS z-index: 1 </div> <div class="box2"> CSS z-index: 2 </div> <div class="box3"> CSS z-index: 3 </div></body></html>CSS z-index - With Negative Integer
You can also use negative integer values for the z-index property. An element with a negative z-index value will be stacked below elements with a higher z-index value.
<html><head><style> .box1 { position: absolute; height: 200px; width: 280px; background-color: #f0baba; z-index: -3; text-align: center; padding: 3px; left: 10px; top: 10px; } .box2 { position: absolute; height: 140px; width: 220px; background-color: #eae98f; z-index: -2; text-align: center; padding: 5px; margin: 10px; left: 30px; top: 30px; } .box3 { position: absolute; height: 90px; width: 160px; background-color: #b7c8ae; z-index: -1; text-align: center; padding: 5px; margin: 20px; left: 50px; top: 50px; } p { margin-top: 250px; }</style></head><body> <p>The element with z-index value of -3 appears behind the element with the z-index value of -2 and -1.</p> <div class="box1"> CSS z-index: -3 </div> <div class="box2"> CSS z-index: -2 </div> <div class="box3"> CSS z-index: -1 </div></body></html> CSS z-index - With Sticky Position
The following example demonstrates how the z-index property can be used to control the stacking order of elements with the position: sticky property, so that they stay fixed in place as the page scrolls
<html><head><style> .box1 { position: sticky; height: 200px; width: 280px; background-color: #f0baba; z-index: 1; text-align: center; padding: 3px; margin: 10px; left: 10px; top: 80px; } .box2 { position: sticky; height: 140px; width: 220px; background-color: #eae98f; z-index: 2; text-align: center; padding: 5px; margin: 10px; left: 40px; top: 200px; } .box3 { position: sticky; height: 90px; width: 160px; background-color: #b7c8ae; z-index: 3; text-align: center; padding: 5px; margin: 10px; left: 70px; } </style></head><body> <p>Move cursor upward to see the effect.</p> <div class="box1"> CSS z-index: 1 </div> <div class="box2"> CSS z-index: 2 </div> <div class="box3"> CSS z-index: 3 </div></body></html> CSS z-index - With Fixed Position
The following example demonstrates how to use the z-index property to make an element stay on top of the content when the user scrolls down, even if it has the position: fixed property
<html><head><style> .container { position: relative; height: 350px; } .box1 { position: fixed; height: 200px; width: 280px; background-color: #f0baba; z-index: -3; text-align: center; padding: 3px; left: 10px; top: 10px; } .box2 { position: fixed; height: 140px; width: 220px; background-color: #eae98f; z-index: -2; text-align: center; padding: 5px; margin: 10px; left: 30px; top: 30px; } .box3 { position: fixed; height: 90px; width: 160px; background-color: #b7c8ae; z-index: -1; text-align: center; padding: 5px; margin: 20px; left: 50px; top: 50px; } h3 { margin-top: 320px; }</style></head><body> <h3>Scroll down the content to see the effect.</h3> <div class="container"> <div class="box1"> CSS z-index: -3 </div> <div class="box2"> CSS z-index: -2 </div> <div class="box3"> CSS z-index: -1 </div> </div></body></html> CSS z-index - With Static Position
The following example shows that the z-index property does not affect the stacking order of elements that have the position: static property
<html><head><style> .box1 { position: static; height: 200px; width: 280px; background-color: #f0baba; z-index: 1; text-align: center; padding: 3px; margin: 10px; left: 10px; top: 10px; } .box2 { position: static; height: 140px; width: 220px; background-color: #eae98f; z-index: 2; text-align: center; padding: 5px; margin: 10px; left: 30px; top: 30px; } .box3 { position: static; height: 90px; width: 160px; background-color: #b7c8ae; z-index: 3; text-align: center; padding: 5px; margin: 10px; left: 50px; top: 50px; }</style></head><body> <p>The z-index property has no effect on the stacking order of elements if the position property is set to static.</p> <div class="box1"> CSS z-index: 1 </div> <div class="box2"> CSS z-index: 2 </div> <div class="box3"> CSS z-index: 3 </div></body></html> CSS z-index - With Relative Position
The example shows that when elements have the position: relative property, the z-index property positions the element relative to its original position in the document flow.
<html><head><style> .box1 { position: relative; height: 200px; width: 280px; background-color: #f0baba; z-index: 1; text-align: center; padding: 3px; margin: 10px; left: 10px; top: 10px; } .box2 { position: relative; height: 140px; width: 220px; background-color: #eae98f; z-index: 2; text-align: center; padding: 5px; margin: 10px; left: 30px; top: 30px; } .box3 { position: relative; height: 90px; width: 160px; background-color: #b7c8ae; z-index: 3; text-align: center; padding: 5px; margin: 10px; left: 50px; top: 50px; }</style></head><body> <p>The z-index property positions the element relative to its original position if position is relative.</p> <div class="box1"> CSS z-index: 1 </div> <div class="box2"> CSS z-index: 2 </div> <div class="box3"> CSS z-index: 3 </div></body></html>